
How to Install Visual Studio Code on Windows & Mac (Easy Step-by-Step Guide)
VS Code Topics – Full Guide
Table of Contents
- 1. Introduction
- 2. What is Visual Studio Code?
- 3. System Readiness and Preparation
- 4. Official Download Methods
- 5. Windows Installation Guide
- 6. macOS Installation Guide
- 7. Adding the `code` Command to PATH
- 8. Beginner Orientation After First Launch
- 9. Recommended First Extensions
- 10. First Configurations After Install
- 11. Updating Visual Studio Code
- 12. Troubleshooting Common Issues
- 13. Clean Uninstall and Reset Basics
- 14. Best Practices and Safety Tips
- 15. Frequently Asked Questions (FAQ)
- 16. Conclusion
- 17. Sources and References
1. Introduction
Welcome to the comprehensive, step-by-step guide on setting up Visual Studio Code (often abbreviated as VS Code).
Getting up and running with Visual Studio Code is quick and easy. It is a lightweight download, allowing you to
install it in a matter of minutes and begin your development journey. This document serves as a full-length,
formal manual detailing everything from official downloads and platform-specific installations (Windows and macOS)
to initial configuration and beginner orientation.
2. What is Visual Studio Code?
Visual Studio Code is a free, powerful, and highly extensible code editor developed by Microsoft. It is designed
to run on your favorite platforms, including Windows, macOS, and Linux. Unlike heavily bloated Integrated
Development Environments (IDEs), VS Code offers a streamlined experience tailored for modern web, desktop, and
cloud development.
Key features include intelligent code completion (IntelliSense), embedded Git control, syntax highlighting,
integrated debugging tools, and an expansive ecosystem of extensions available through the Visual Studio
Marketplace. It is ideal for everyone from beginner programmers writing their first script to enterprise
developers architecting large-scale applications.
3. System Readiness and Preparation
Before installing Visual Studio Code, it is prudent to ensure your system meets the baseline requirements. Because
VS Code is lightweight, it runs comfortably on most available hardware.
- Operating System: Ensure you are on a supported version of Windows (Windows 10/11) or macOS
(Mojave or newer recommended). - Hardware: A minimum of 1.6 GHz or faster processor with 1 GB of RAM is recommended.
- Storage: The initial download is under 200 MB, but you should have at least 500 MB of free
disk space for the installation and future extensions. - Administrator Access: While Windows offers a user-level setup, having administrator access is
helpful if you plan to install the system-wide version or additional development dependencies like Node.js or
Python.
4. Official Download Methods
It is critical to download Visual Studio Code strictly from official Microsoft sources to ensure you are receiving
safe, unmodified, and virus-free software. Avoid third-party aggregation sites.
Navigate to the official download page: https://code.visualstudio.com/download. Here you will find
direct links for Windows, macOS, and Linux platforms.
5. Windows Installation Guide
Installing VS Code on Windows is a straightforward process, primarily driven by a traditional setup wizard.
5.1. The Installer Method
- Navigate to the official download page and download the Visual Studio Code installer for Windows.
- Once downloaded, run the executable file named
VSCodeUserSetup-{version}.exe. - Accept the license agreement and proceed through the prompts.
- By default, VS Code is installed under the path:
C:\Users\{Username}\AppData\Local\Programs\Microsoft VS Code. - During the “Select Additional Tasks” screen, it is highly recommended to check the options to “Add to PATH” and
register Code as an editor for supported file types.
5.2. ZIP Archive Option
For users who prefer a portable installation without modifying system registries, a ZIP archive is available. You
simply download the ZIP file, extract it to a folder of your choice (such as AppData\Local\Programs),
and run the Code.exe file directly. However, note that if you install via the ZIP file, you will need
to manually update the software for each new release.
5.3. User Setup vs System Setup
VS Code provides both Windows User and System level setups. The table below outlines the distinctions:
| Setup Type | Description |
|---|---|
| User Setup (Recommended) | Does not require administrator privileges to run. Installs into the user’s LOCALAPPDATA folder.Provides a smoother, background auto-update experience. |
| System Setup | Requires elevation to administrator privileges. Installs into the system’sProgram Files directory, making it available to all users on the computer. Updates also requireelevation. |
5.4. Install Path and PATH Behavior
As mentioned, the setup adds Visual Studio Code to your system’s %PATH% environment variable. This
integration allows you to open a command prompt or PowerShell window and simply type code . to open
VS Code in the current directory. You must restart your console or terminal after installation for the changes to
the environment variable to take effect.
6. macOS Installation Guide
The macOS installation follows the standard drag-and-drop paradigm common to Apple software.
6.1. DMG Method
- Download the Visual Studio Code for macOS package from the official site.
- Locate and open the downloaded
.dmgfile or.zipfile in your Downloads folder. - Drag the extracted
Visual Studio Code.appfile into your Applications folder to
properly install it.
6.2. First Launch and Keeping in Dock
Open VS Code by double-clicking the icon in the Applications folder. To make it easily accessible in the future,
add it to your Dock: right-click (or Control-click) on the VS Code icon currently active in the Dock, select
Options, and then select Keep in Dock.
6.3. Apple Silicon Note
VS Code natively supports macOS Arm64 builds that run on Macs with Apple silicon chipsets (M1, M2, M3, etc.). When
you download from the official site, you will generally receive the Universal build, which includes both Intel and
Apple silicon architectures, ensuring maximum performance regardless of your Mac’s internal hardware.
7. Adding the `code` Command to PATH
Launching VS Code directly from your terminal is an essential workflow optimization for developers.
7.1. Windows PATH Note
If you used the Windows Installer, this is configured automatically. Ensure you have restarted your terminal or
command prompt for the new %PATH% variables to initialize. Typing code . will open the
current folder.
7.2. macOS Shell Command Method
On macOS, the path configuration must be triggered manually via the application itself:
- Launch Visual Studio Code.
- Open the Command Palette by pressing
Cmd + Shift + P. - Type “shell command” to filter the options.
- Select the option: Shell Command: Install ‘code’ command in PATH.
- Restart your terminal for the new
$PATHvalue to take effect.

7.3. macOS Manual PATH Method
If you prefer to configure your environment manually (e.g., using Zsh or Bash), you can append the path directly
to your profile configuration.
For Zsh (default on newer macOS versions), you would conceptually add the following line to your
~/.zprofile:
export PATH="$PATH:/Applications/Visual Studio Code.app/Contents/Resources/app/bin"
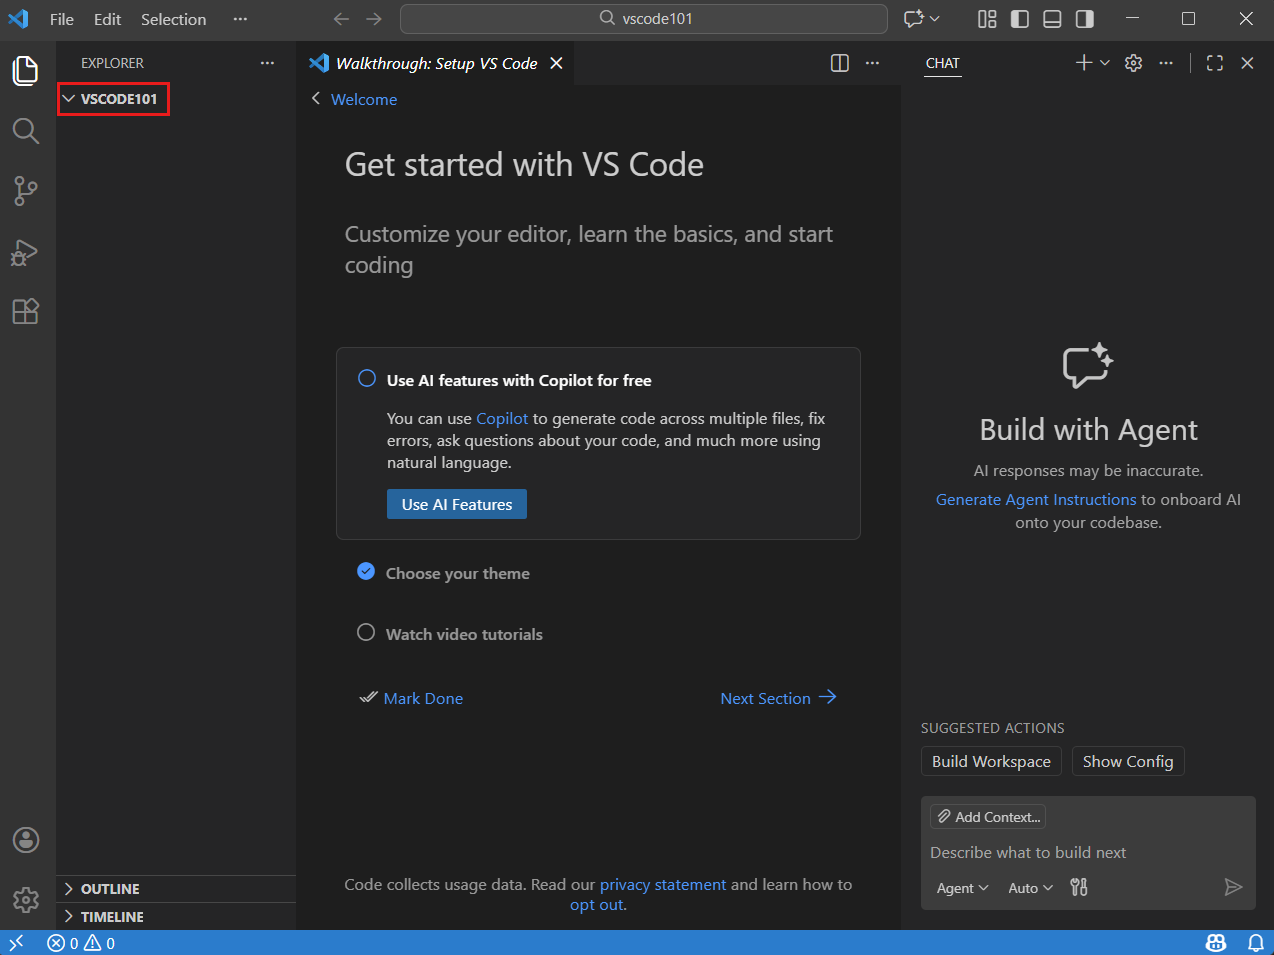
8. Beginner Orientation After First Launch
Opening Visual Studio Code for the first time reveals a clean, modern interface. Understanding how to navigate
this environment is paramount to productivity.
8.1. Open Folder / Workspace
VS Code does not rely on a traditional “File > New Project” wizard. Instead, it operates on folders. Select
File > Open Folder… (or Open… on macOS) to open a directory containing your files.
This directory becomes your “Workspace.”
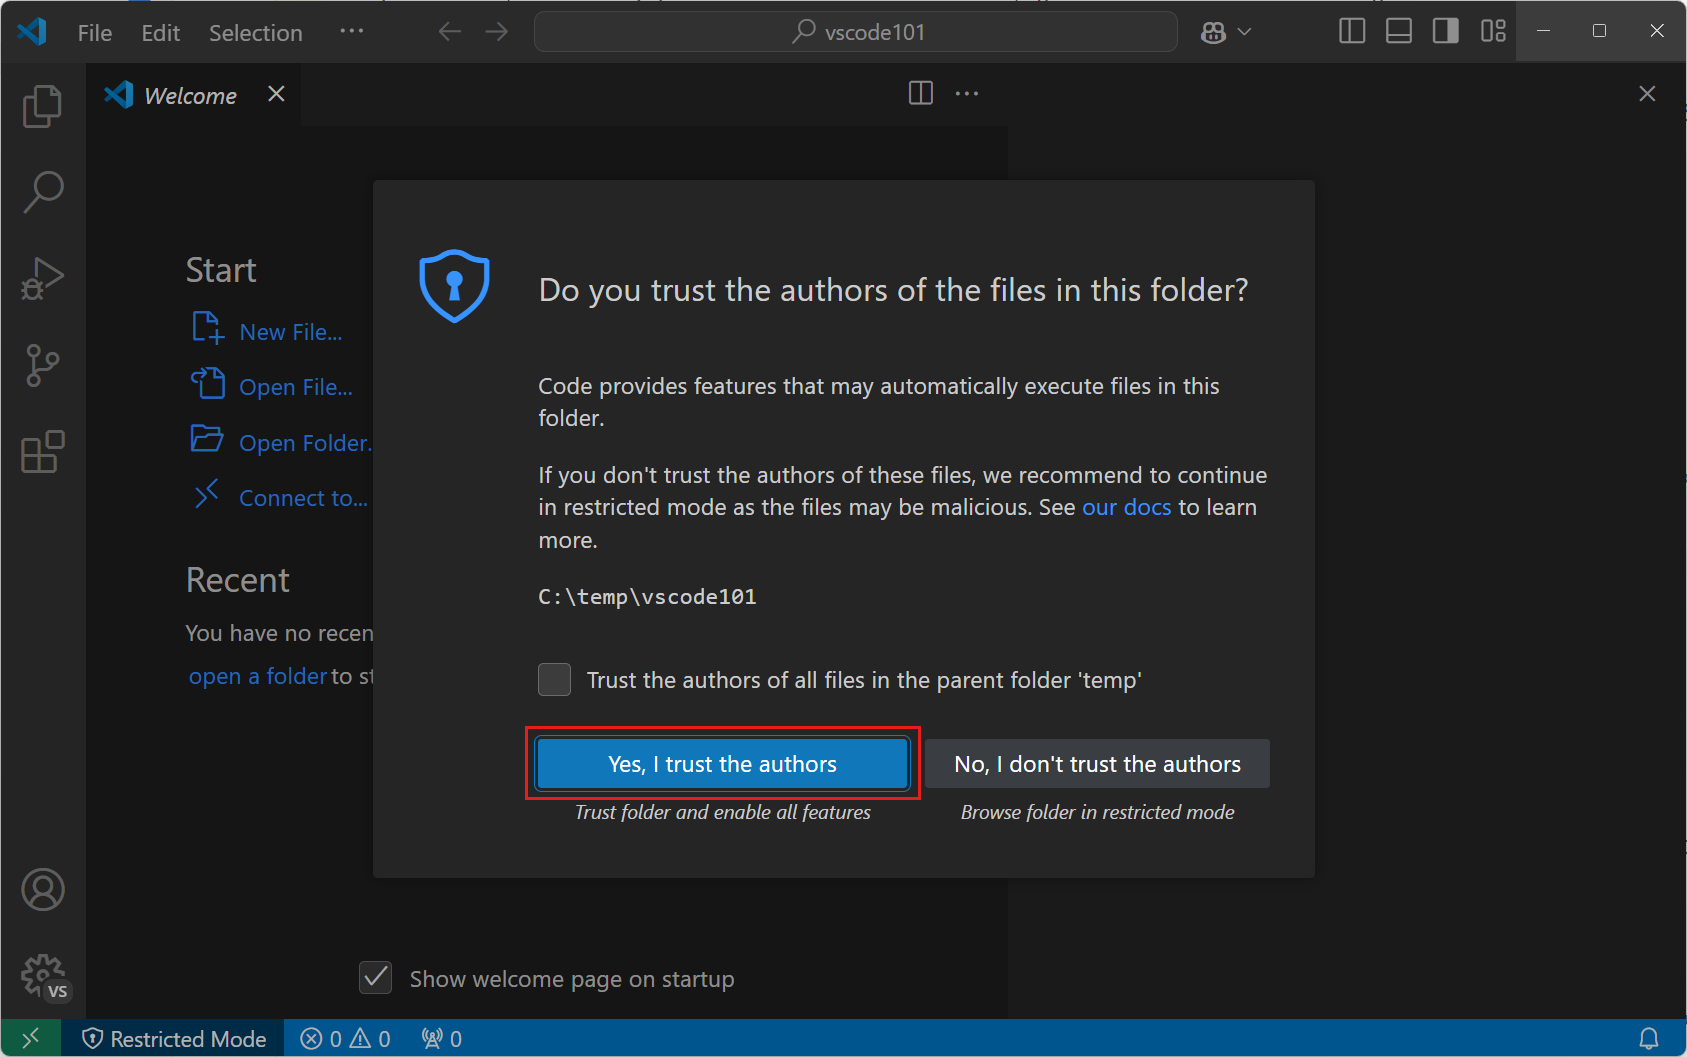
8.2. Workspace Trust
Upon opening a new folder, you will be prompted by the Workspace Trust dialog. This is a security feature designed
to prevent malicious code from executing automatically. If you created the folder or trust its source, select
Yes, I trust the authors to enable all editor features, tasks, and debugging extensions.
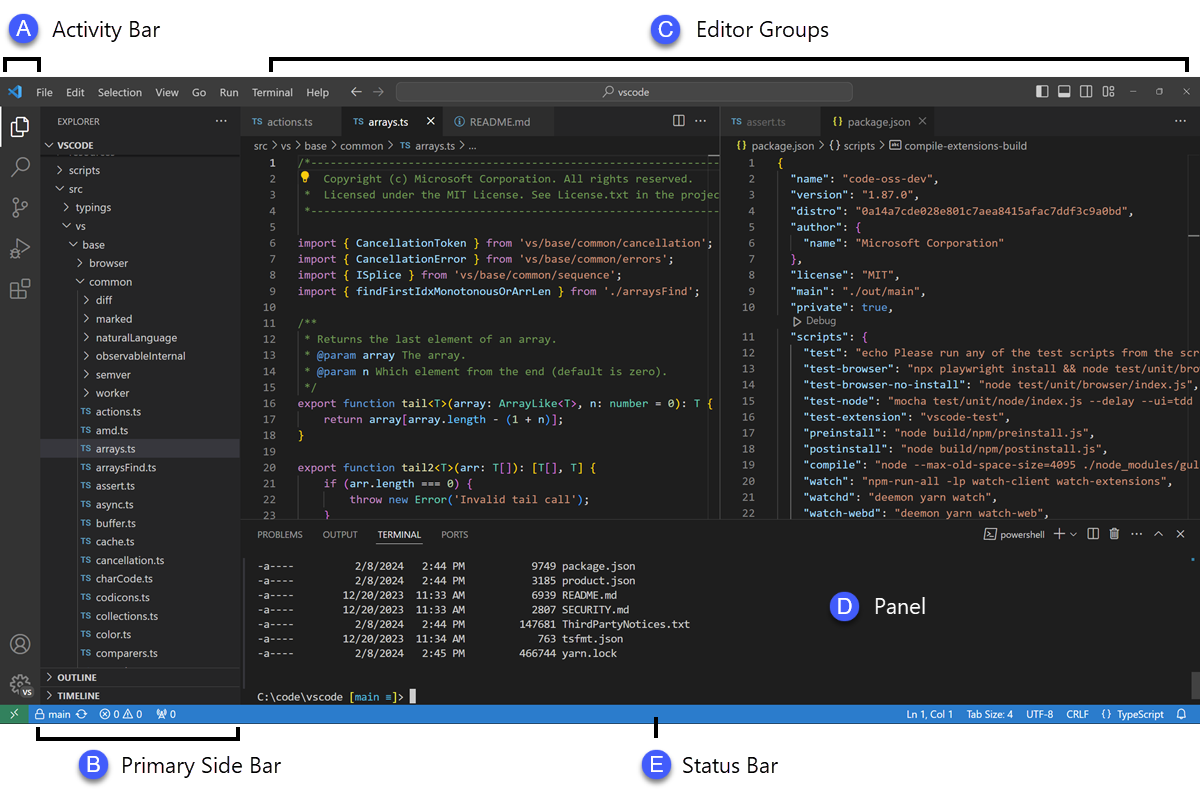
8.3. Quick Tour of Main UI Areas
The user interface is logically divided into six main components:
- Editor: The primary right-hand area where you edit files.
- Primary Side Bar: The left-hand panel containing views like the File Explorer, Search, and
Source Control. - Secondary Side Bar: An optional area on the opposite side of the Primary Side Bar, often
utilized for tools like Chat. - Activity Bar: The narrow vertical strip on the far left edge used to toggle between different
views (Explorer, Extensions, etc.). - Panel: The horizontal area below the editor housing the integrated terminal, debug console,
output, and problem logs. - Status Bar: The bottom strip displaying active project information, language modes, and file
encoding details.
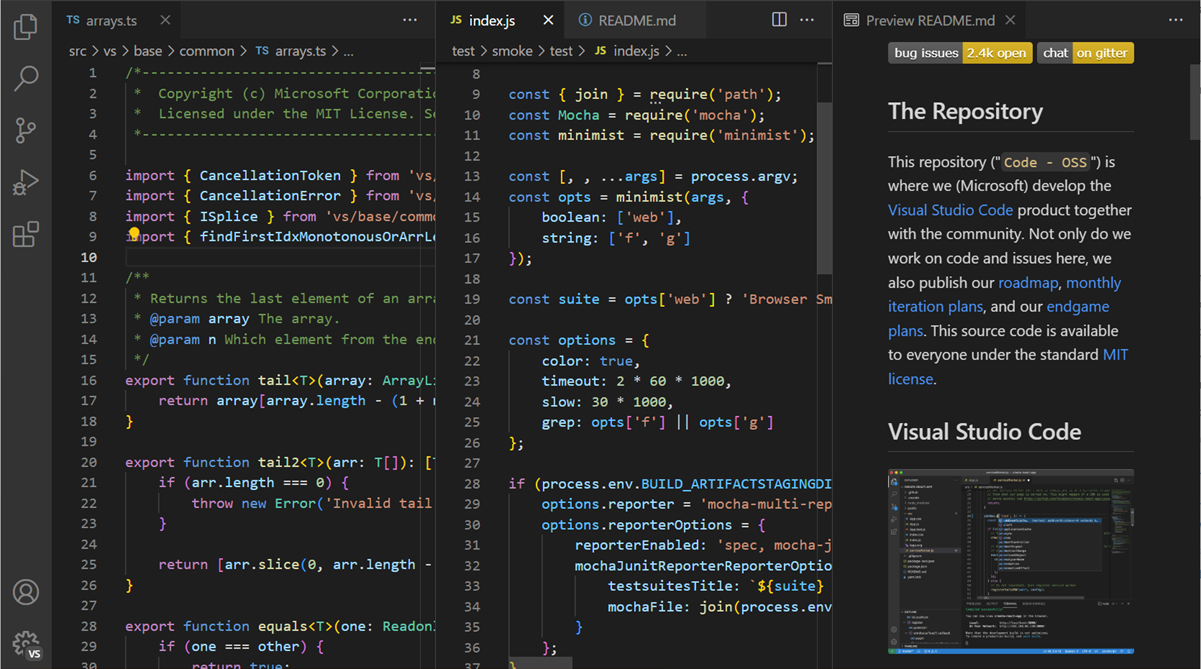
8.4. Side-by-Side Editor Overview
You can open as many editors as you like side by side vertically and horizontally. This is excellent for comparing
files or referencing documentation while writing code.
14. Best Practices and Safety Tips
As you establish your development environment, keep these best practices in mind:
- Always utilize the Workspace Trust feature carefully. Do not trust workspaces downloaded from unknown or
unverified internet sources. - Review extensions before installing. Check the publisher name, download count, and user ratings in the Visual
Studio Marketplace to ensure authenticity. - Routinely back up your settings using the built-in Settings Sync tied to a Microsoft or GitHub account.
- Maintain your operating system and VS Code installations with the latest updates to benefit from security
patches.
15. Frequently Asked Questions (FAQ)
Q: What are the system requirements for VS Code?
A: VS Code requires a 1.6 GHz or faster processor, 1 GB of RAM, and supports Windows, macOS, and Linux. It
requires minimal disk space (under 500 MB).
Q: How do I know which version I’m running?
A: On Windows, choose Help > About. On macOS, use
Code > About Visual Studio Code. The dialog displays the version number and the specific commit
ID.
Q: Does VS Code run on Apple silicon?
A: Yes, the Universal build from the official site natively supports Apple silicon (Arm64).
Q: Why does macOS Mojave ask for calendar/contacts permission?
A: This is due to macOS Mojave’s privacy protections. VS Code does not inherently need access to these folders;
you may safely click “Don’t Allow.”
16. Conclusion
Setting up Visual Studio Code on Windows and macOS is an intuitive process designed to get you coding as rapidly
as possible. By downloading the official installers, appropriately configuring your system paths, and
familiarizing yourself with the core layout and workspace trust features, you create a robust foundation for your
software development efforts. Enjoy exploring the highly customizable, AI-assisted, and extension-rich environment
that has made VS Code an industry standard.
17. Sources and References
The information and procedures documented in this guide are directly sourced from the official Microsoft Visual
Studio Code documentation:
- Official Download Portal:
https://code.visualstudio.com/download - Windows Setup Documentation:
https://code.visualstudio.com/docs/setup/windows - macOS Setup Documentation:
https://code.visualstudio.com/docs/setup/mac - Setup Overview and Portability:
https://code.visualstudio.com/docs/setup/setup-overview - Getting Started and Workspace Trust:
https://code.visualstudio.com/docs/getstarted/getting-started - User Interface Layout Guide:
https://code.visualstudio.com/docs/getstarted/userinterface