
Best VS Code Setup for Students and Free vs Paid Alternatives Compared
VS Code Topics – Full Guide
Executive Summary
Visual Studio Code (VS Code) has become the de facto standard for code editing across educational and professional
environments. Its flexibility, extensive marketplace, and lightweight nature make it ideal for students. This
comprehensive guide outlines the best setup configurations, explores free versus paid alternatives, and provides
actionable steps for deploying standardized profiles across multiple devices using VS Code Profiles and Settings
Sync.
- Why VS Code Works Well for Students
- Part I: Best VS Code Setup for Students
- Prerequisites & Installation
- First-Launch Tour & Interface
- Best Settings & Extensions
- Workspace Organization & Performance
- Part II: Free vs Paid Alternatives of Visual Studio Code
- Part III: How to Deploy and Sync a Student Setup Properly
- Troubleshooting and Best Practices
- Final Recommendations
- Sources and References
Why VS Code Works Well for Students
Visual Studio Code is developed by Microsoft and is provided entirely free of charge for both private and
commercial use. It offers a powerful combination of a simple text editor interface with the complex debugging and
source control capabilities of a full Integrated Development Environment (IDE). For students, it is lightweight
enough to run on budget laptops, highly customizable to fit various curricula (from introductory Python to
advanced Web Development), and universally used in the tech industry, providing students with realistic
professional experience.
Part I: Best VS Code Setup for Students
Hardware and Software Prerequisites
VS Code is designed to run efficiently on most modern hardware. A standard student laptop running Windows 10/11,
macOS 10.15+, or any major Linux distribution (Ubuntu, Debian, Fedora) will suffice. Recommended minimum
specifications include a 1.6 GHz or faster processor and at least 4 GB of RAM, though 8 GB is advised for running
heavy extensions or background compilers.
Installation Basics
- Windows: Download the System Installer from the official website. During installation, it is
highly recommended to check the options “Add to PATH” and “Add ‘Open with Code’ action to Windows Explorer” for
ease of access. - macOS: Download the `.zip` file, extract the application, and drag it into the Applications
folder. You can also install it via Homebrew usingbrew install --cask visual-studio-code. - Linux: The easiest method for Debian/Ubuntu distributions is to download the `.deb` package and
install it via the terminal or software center. Snap packages are also available.
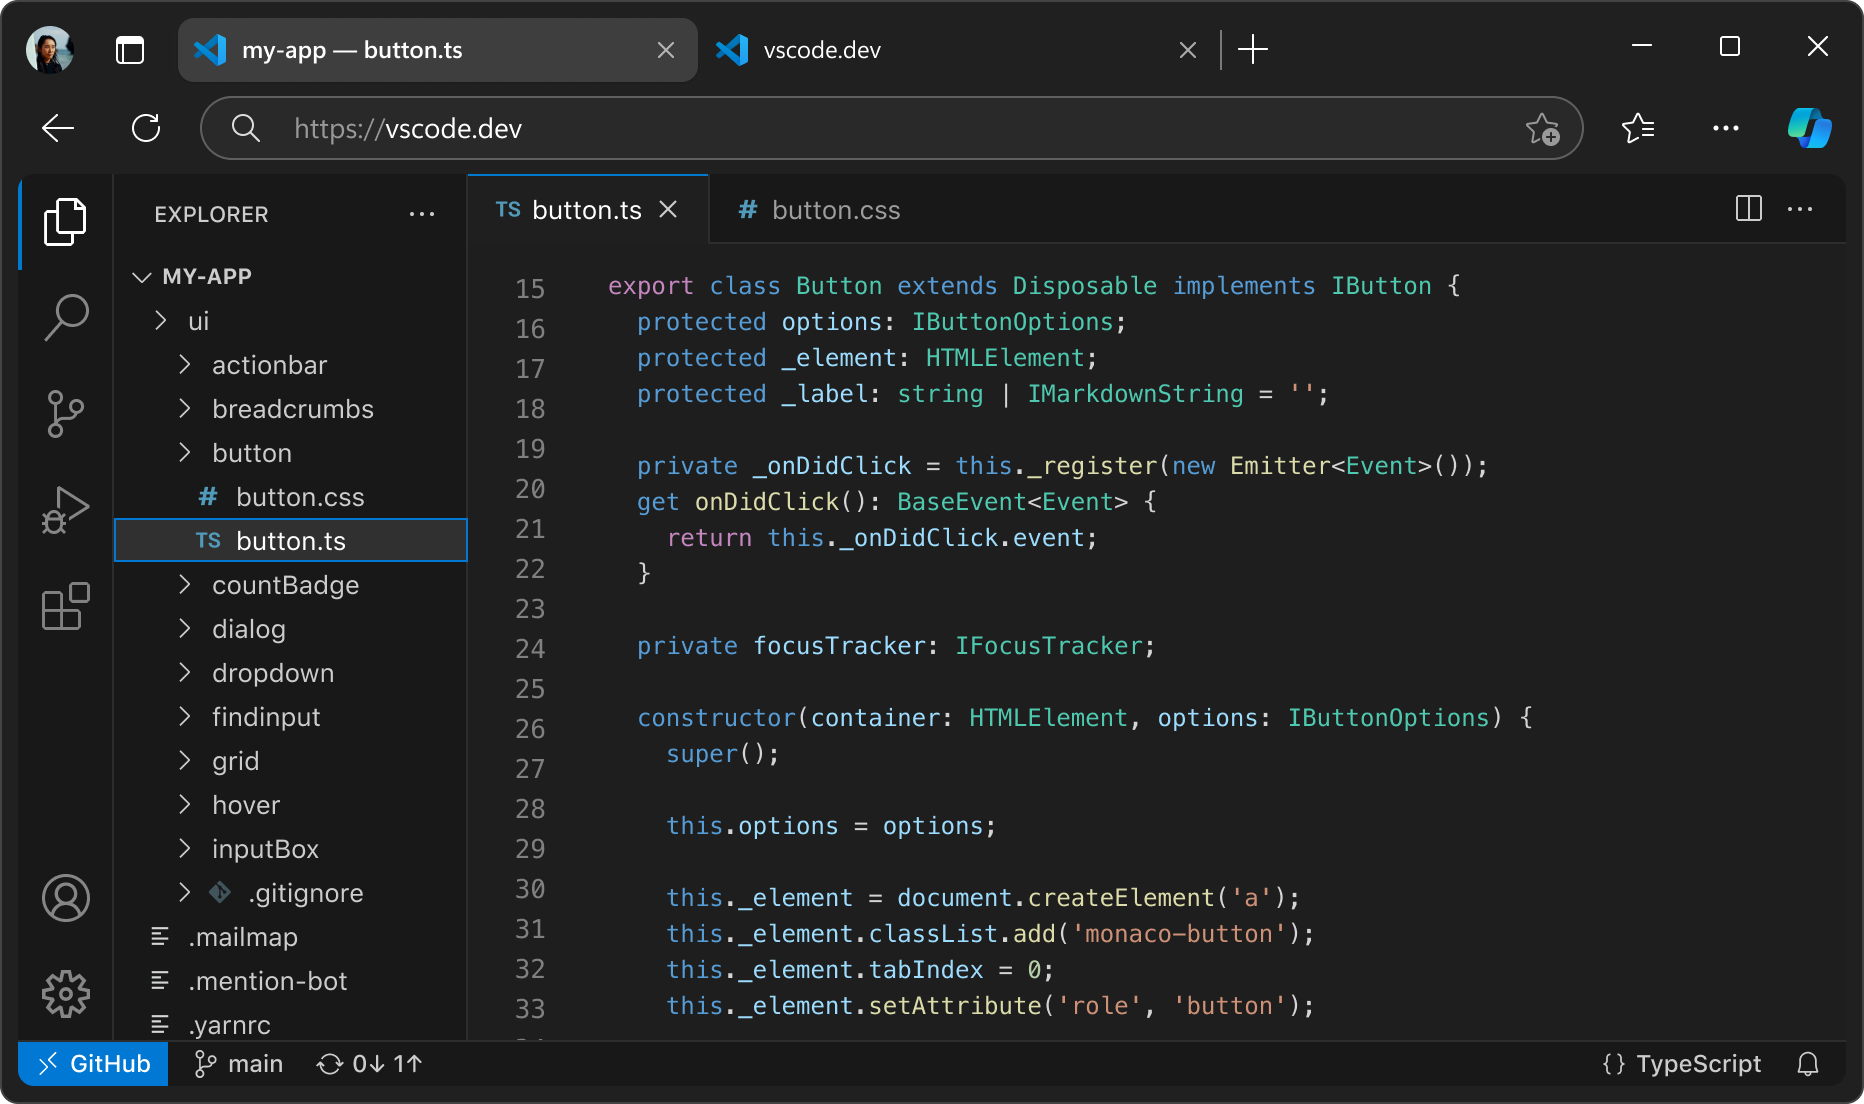
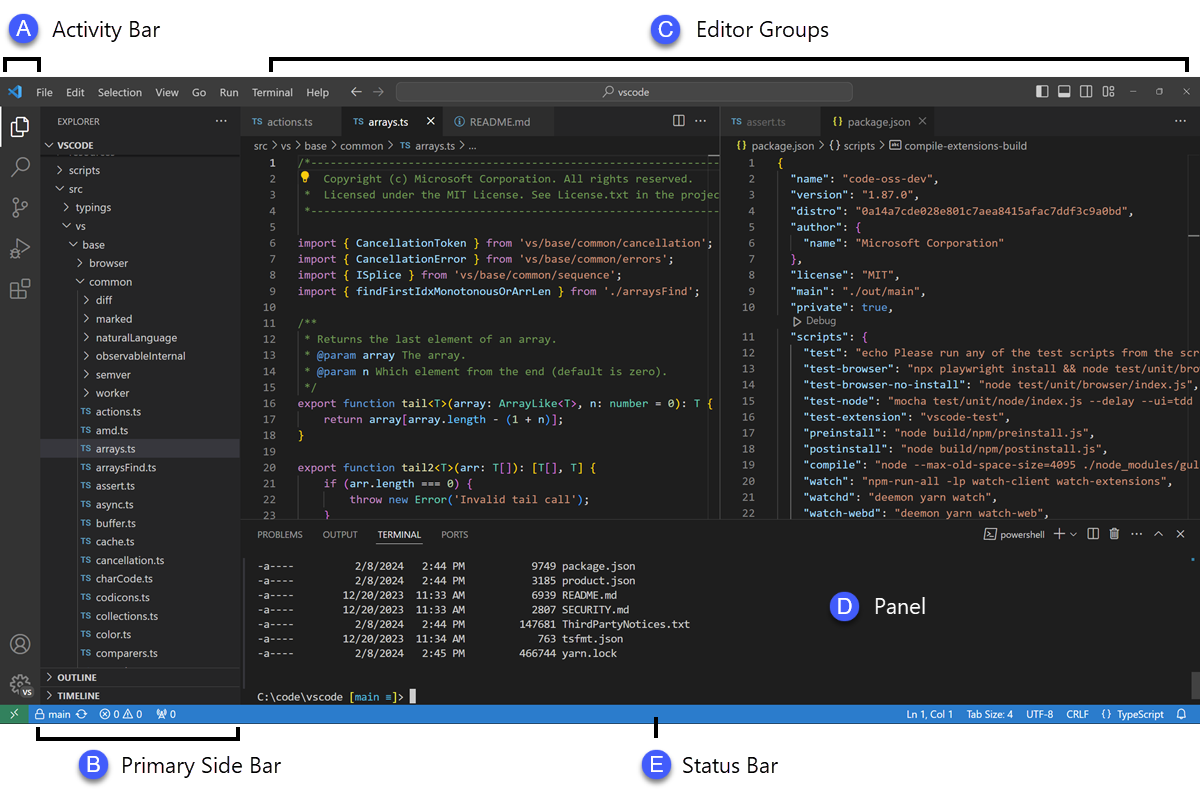
First-Launch Tour of the Interface
Upon opening VS Code, students will encounter a clean, customizable interface. The layout consists of an Activity
Bar on the far left (for navigating between files, search, source control, running/debugging, and extensions), a
Primary Side Bar, the main Editor window, and a Status Bar at the bottom.
Best Settings for Students
A good student setup should reduce distractions, prevent common mistakes, and make files easier to read during
lectures or lab sessions. The goal is not to turn VS Code into a highly customized power-user editor on day one.
The goal is to make it predictable. Students benefit most from a small set of sensible defaults that improve
visibility, save work automatically, and keep formatting consistent across assignments.
- Auto Save: Use
"files.autoSave": "afterDelay"to reduce the chance of losing work. - Word Wrap: Turn on
"editor.wordWrap": "on"for easier reading on small screens. - Format on Save: Use
"editor.formatOnSave": trueso assignments stay neat and consistent. - Rulers: Add a ruler at 80 or 100 characters to teach readable line length habits.
- Minimap: Disable it on low-resolution laptops to free screen space.
- Tab Size: Keep indentation predictable with
"editor.tabSize": 2or4, depending on the class. - Linked Editing: Helpful for HTML beginners because matching tags update together.
- Accessibility: Increase zoom and cursor width if reading code for long periods causes fatigue.
For classrooms, the biggest source of confusion is inconsistent formatting. If one student uses tabs, another uses
spaces, and a third forgets to save files, grading and collaboration get harder. A standard settings baseline
solves this quickly.
A practical starter settings.json for most students looks like this:
{
  "files.autoSave": "afterDelay",
  "editor.wordWrap": "on",
  "editor.formatOnSave": true,
  "editor.minimap.enabled": false,
  "editor.linkedEditing": true,
  "editor.rulers": [100],
  "terminal.integrated.defaultProfile.windows": "PowerShell"
}
Best Extensions for Students
Extensions are where VS Code becomes truly student-friendly. The mistake many beginners make is installing too
many at once. A better approach is to install only the extensions that match the current course. The table below
lists practical picks that are widely useful, easy to understand, and relevant across school projects.
| Category | Extension Name | Why It Helps Students | Recommended For |
|---|---|---|---|
| Coding Basics | Prettier – Code formatter | Automatically formats web files and teaches good code layout habits from the start. | HTML, CSS, JavaScript, TypeScript |
| Beginner Debugging | Error Lens | Shows errors inline so beginners do not have to hunt through panels to understand mistakes. | All beginner courses |
| Writing / Docs | Markdown All in One | Excellent for class notes, READMEs, project reports, and documentation assignments. | All students |
| Version Control | GitLens | Helps students understand commit history, file changes, and collaboration in team assignments. | CS/IT, project teams |
| Web Development | Live Server | Runs HTML/CSS/JS projects locally with live reload, which is ideal for instant feedback. | Web design, frontend classes |
| Python | Python (Microsoft) | Adds linting, IntelliSense, debugging, and notebook support for introductory and advanced Python work. | Python, data science, automation |
| Python Notebooks | Jupyter | Useful for labs, data analysis, and classes where code and explanation need to live together. | Data science, research, AI courses |
| Spell Checking | Code Spell Checker | Reduces embarrassing typos in variable names, comments, documentation, and markdown files. | All students |
| Path Productivity | Path Intellisense | Autocompletes file paths, which is especially helpful in web projects with many assets. | Web projects, static sites |
| Containers / Dev Environments | Dev Containers | Best for advanced classes where students need the same reproducible environment on every machine. | Advanced CS, labs, shared environments |
Most students should begin with five extensions or fewer. A light setup is faster, easier to troubleshoot, and
less intimidating than a fully loaded environment.


Student-Friendly Workspace Organization
Students should create a dedicated root folder for all coursework (e.g., Documents/University/CS101).
Using VS Code’s “Open Folder” command sets this directory as the current Workspace, allowing the editor to
contextualize searches and Git repositories. Never open the entire hard drive (e.g., `C:\`) as a workspace.
If VS Code feels sluggish on budget hardware, disable hardware acceleration, limit the number of active extensions
to only those needed for the current class, and utilize the browser-based version (vscode.dev) for lightweight
text editing without local overhead.
Security and Workspace Trust
When opening a folder downloaded from the internet or provided by a peer, VS Code will prompt a “Workspace Trust”
dialogue. Students should understand that trusting a workspace allows extensions to execute code automatically.
Only trust folders originating from the instructor, official school repos, or personal creations.
Part II: Free vs Paid Alternatives of Visual Studio Code
This section answers a common student question: Is VS Code free, and if it is free, what exactly costs money?
The short answer is simple. VS Code itself is free. What may cost money are optional AI services,
premium usage tiers, enterprise features, or alternative editors built around AI-first workflows.
The official VS Code editor is free for private and commercial use. Students can install it, use it for class,
and build real projects without paying. Paid costs usually appear only when users add premium AI assistance.
Why Students Compare These Tools
In 2026, students are not only choosing an editor. They are choosing a workflow. Some want a clean, traditional
editor. Others want privacy-first software. Others want AI to explain code, generate boilerplate, review logic,
and help with debugging. The right choice depends on budget, privacy needs, and how much AI assistance the user
wants to rely on.
| Tool | Type | Pricing Orientation | Main Strengths | Trade-Offs |
|---|---|---|---|---|
| VS Code | General-purpose editor | Free | Best ecosystem, huge extension library, great documentation, widely taught and widely used. | Telemetry and optional Microsoft services may matter to privacy-sensitive users. |
| VSCodium | Open-source VS Code build | Free | MIT-licensed binaries, telemetry disabled, familiar interface. | Some Microsoft marketplace or proprietary extension workflows can be less convenient. |
| VS Code + GitHub Copilot | Free editor + paid AI add-on | Free tier available; paid tiers for heavier use | Easy upgrade path from standard VS Code, integrated chat and completions, strong beginner experience. | AI quality depends on prompt quality, and serious use may require a subscription. |
| Cursor | AI-first editor | Free tier; paid Pro and higher tiers | Excellent for codebase-aware editing, repo-wide operations, and AI-heavy workflows. | Can be overkill for beginners; cost rises if used as a daily primary AI environment. |
| Windsurf | AI-first editor | Free tier; paid Pro/Teams options | Strong AI workflow features, collaborative orientation, useful for experimentation. | Less standardized in classrooms than plain VS Code; students may need time to adapt. |
1. Standard VS Code
Standard VS Code remains the safest recommendation for most students. It is mature, stable, well documented, and
supported on Windows, macOS, Linux, and the web. It also maps well to academic reality: many instructors teach
with it, many tutorials assume it, and many employers recognize it immediately.
Best for: beginners, general coursework, web development, Python classes, Git-based assignments,
and anyone who wants the largest support ecosystem.
2. VSCodium
VSCodium is best understood as the privacy-focused route. It uses the open-source VS Code codebase but removes the
Microsoft-specific telemetry customization present in the official build. For institutions with strict software
policies, this can be a decisive advantage.

VSCodium is often the strongest recommendation when privacy policy matters more than perfect compatibility with the
Microsoft ecosystem. The trade-off is that students may occasionally need manual workarounds for certain extensions.
3. VS Code + GitHub Copilot
This option keeps the familiar VS Code editor while adding AI assistance. For students, this is often the most
balanced paid path because it does not force a full editor switch. You keep the same extensions, the same layout,
and the same class workflow while gaining code suggestions and AI chat support.
Who should consider it: students who already work comfortably in VS Code and want help with syntax,
boilerplate, explanations, or debugging support. It is especially useful for individual learners studying outside
class hours.
4. Cursor
Cursor is an AI-first editor with a strong reputation for large-context assistance and repository-aware code edits.
It can feel dramatically more powerful than plain completions when students are working on large projects, capstone
work, or internship tasks. However, for brand-new programmers, too much AI can become a crutch rather than a coach.
Best for: advanced students, hackathon teams, startup interns, and users who regularly ask an AI to
edit multiple files or explain relationships across a full project.
5. Windsurf
Windsurf is another AI-centric option that appeals to users who want a modern assistant-led workflow. It can be a
strong choice for users who enjoy exploring AI-assisted flows and want more than traditional autocomplete. That
said, because most classrooms still standardize on regular VS Code, Windsurf is often better treated as a personal
productivity upgrade than a required classroom baseline.
If you are a student on a budget, do not start with the most advanced paid AI editor. Start with standard VS Code.
Only upgrade when you can clearly explain what limitation you are trying to solve.
Practical Buying Advice
- If you need free and simple: standard VS Code.
- If you need free and privacy-oriented: VSCodium.
- If you want AI without changing editors: VS Code + GitHub Copilot.
- If AI is central to your workflow: evaluate Cursor or Windsurf.
- If you are in a school lab or standardized course: avoid unnecessary variation and keep the class on one baseline tool.
Part III: How to Deploy and Sync a Student Setup Properly
A good student setup is not complete until it can be repeated. That is the difference between a one-time editor
installation and a real academic workflow. VS Code provides two built-in features that solve this problem:
Profiles and Settings Sync. Together, they let students move between a school lab,
library computer, personal laptop, and home desktop without rebuilding everything manually.
Understanding Profiles
A Profile is a named package of editor customizations. It can include extensions, settings, keybindings, tasks,
snippets, and UI preferences. This is ideal for education because one course setup does not always fit another.
A student may want a clean profile for Python, another for web development, and another for writing markdown notes.
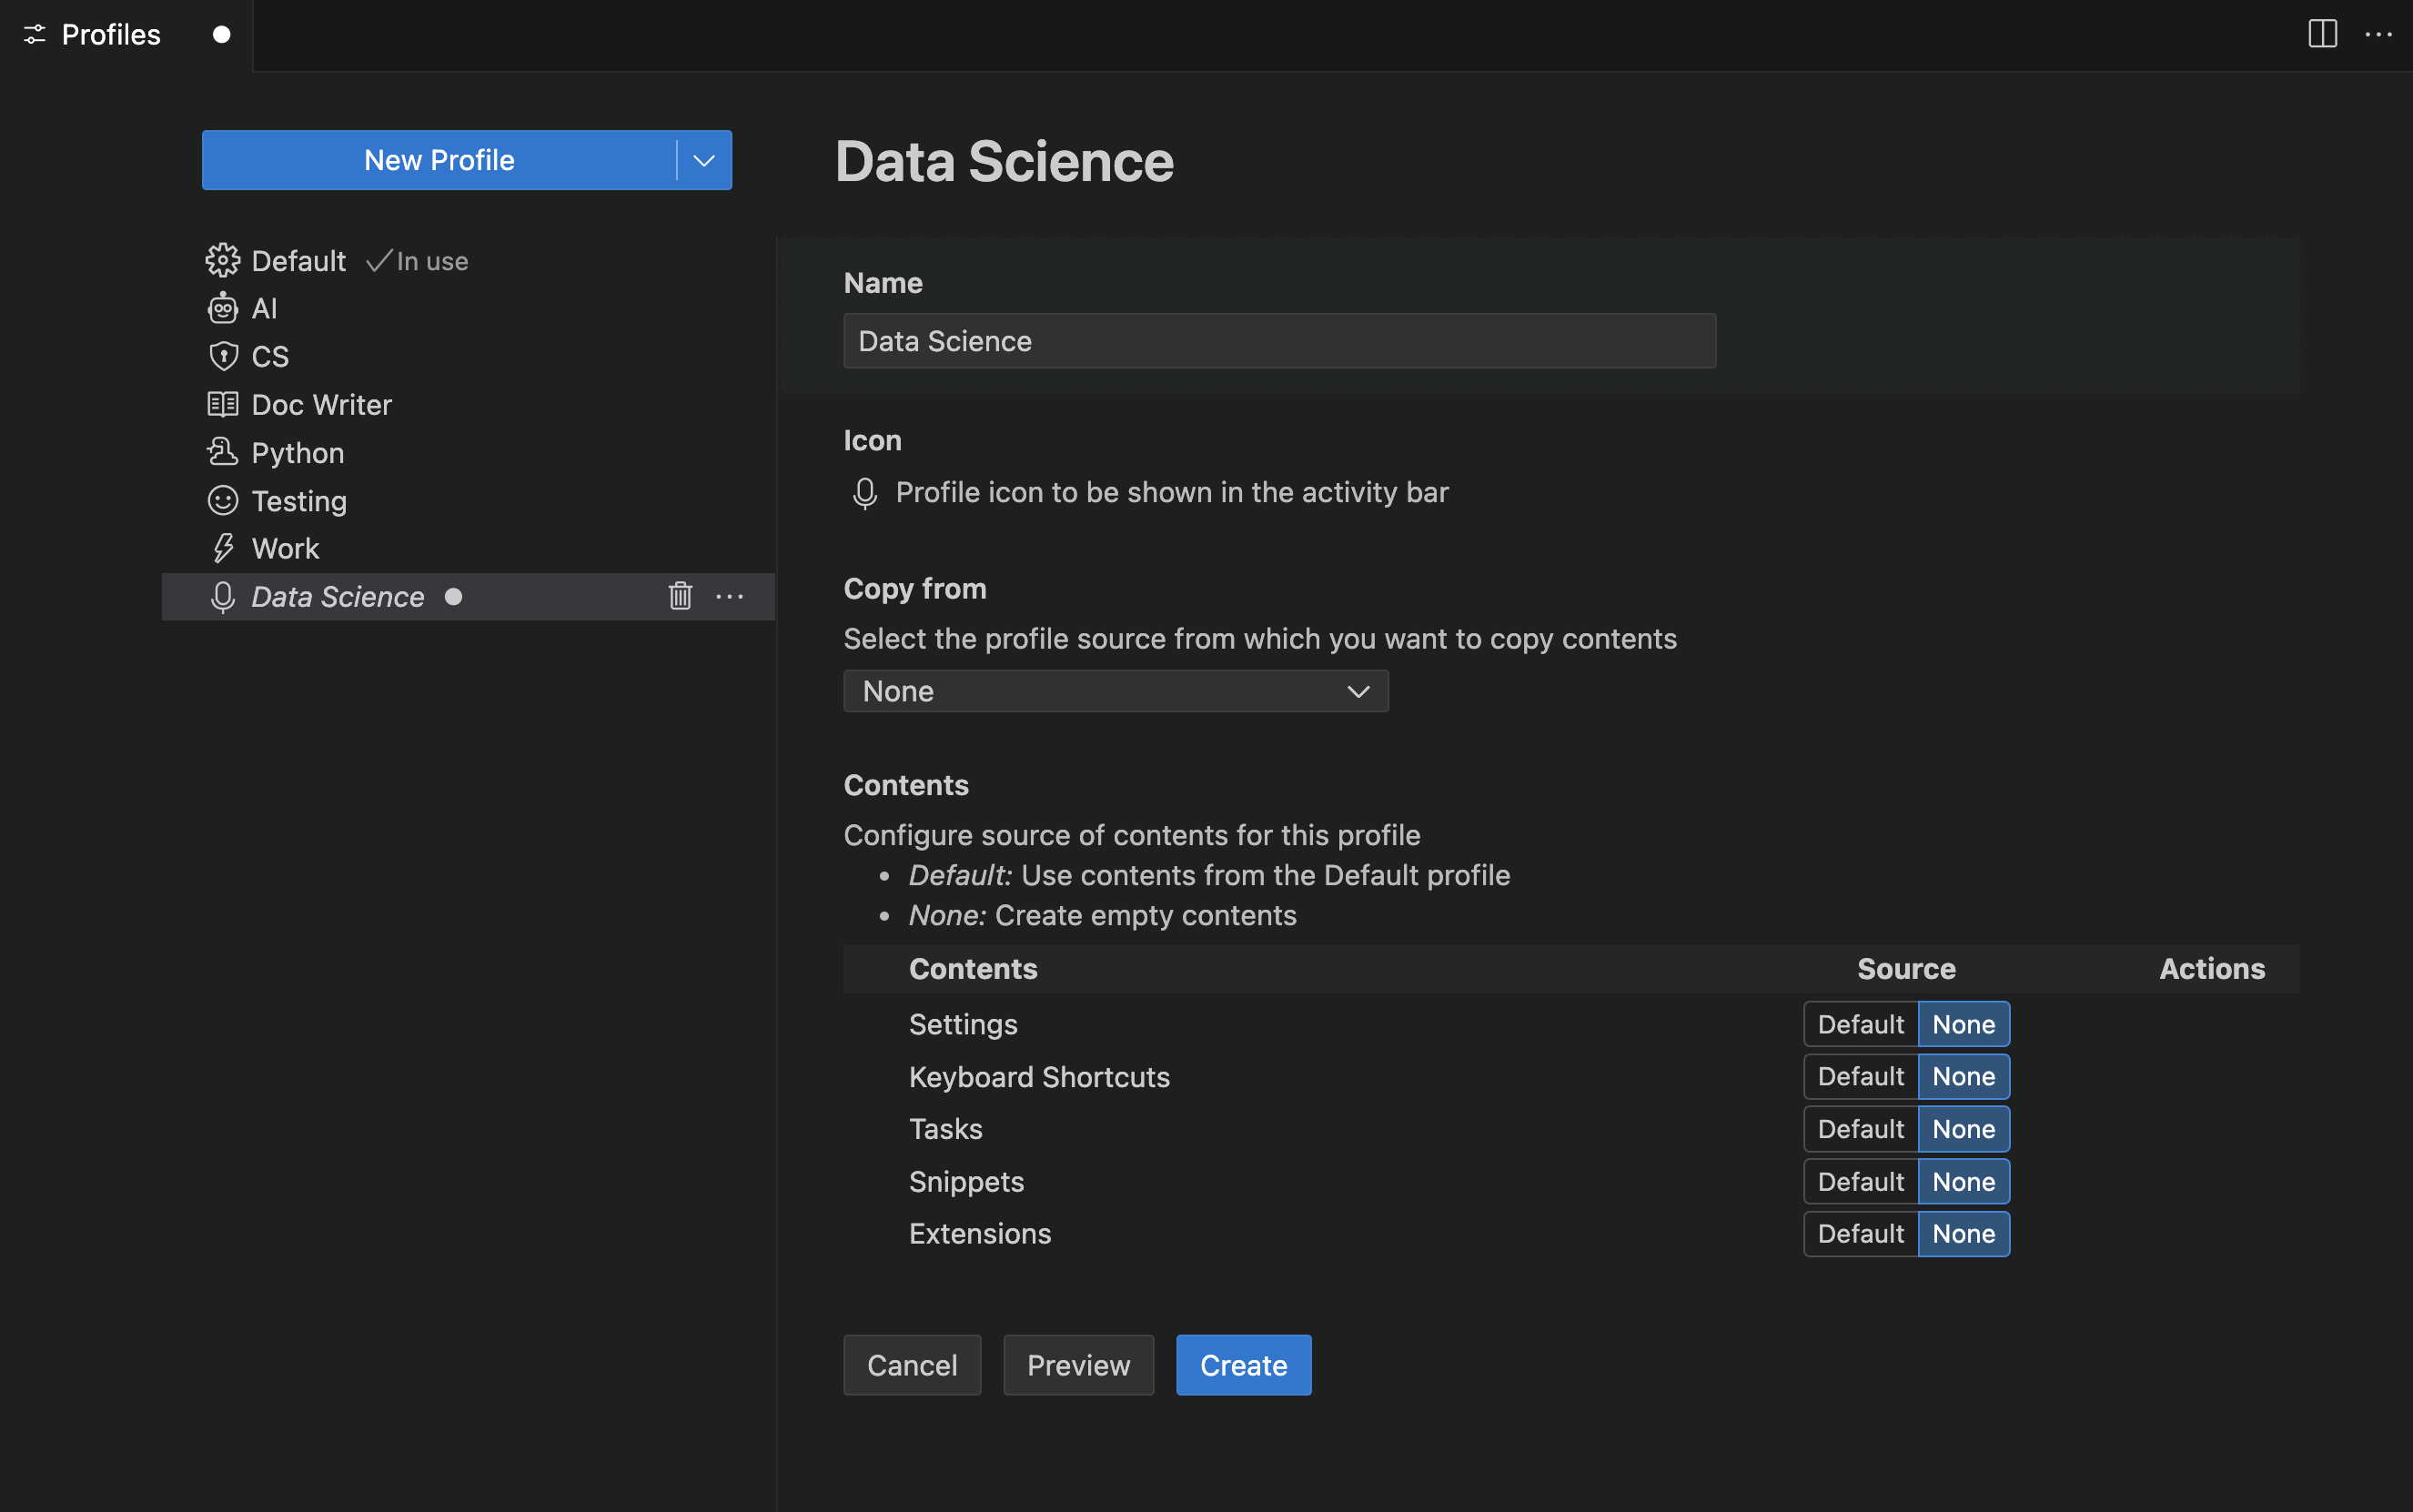
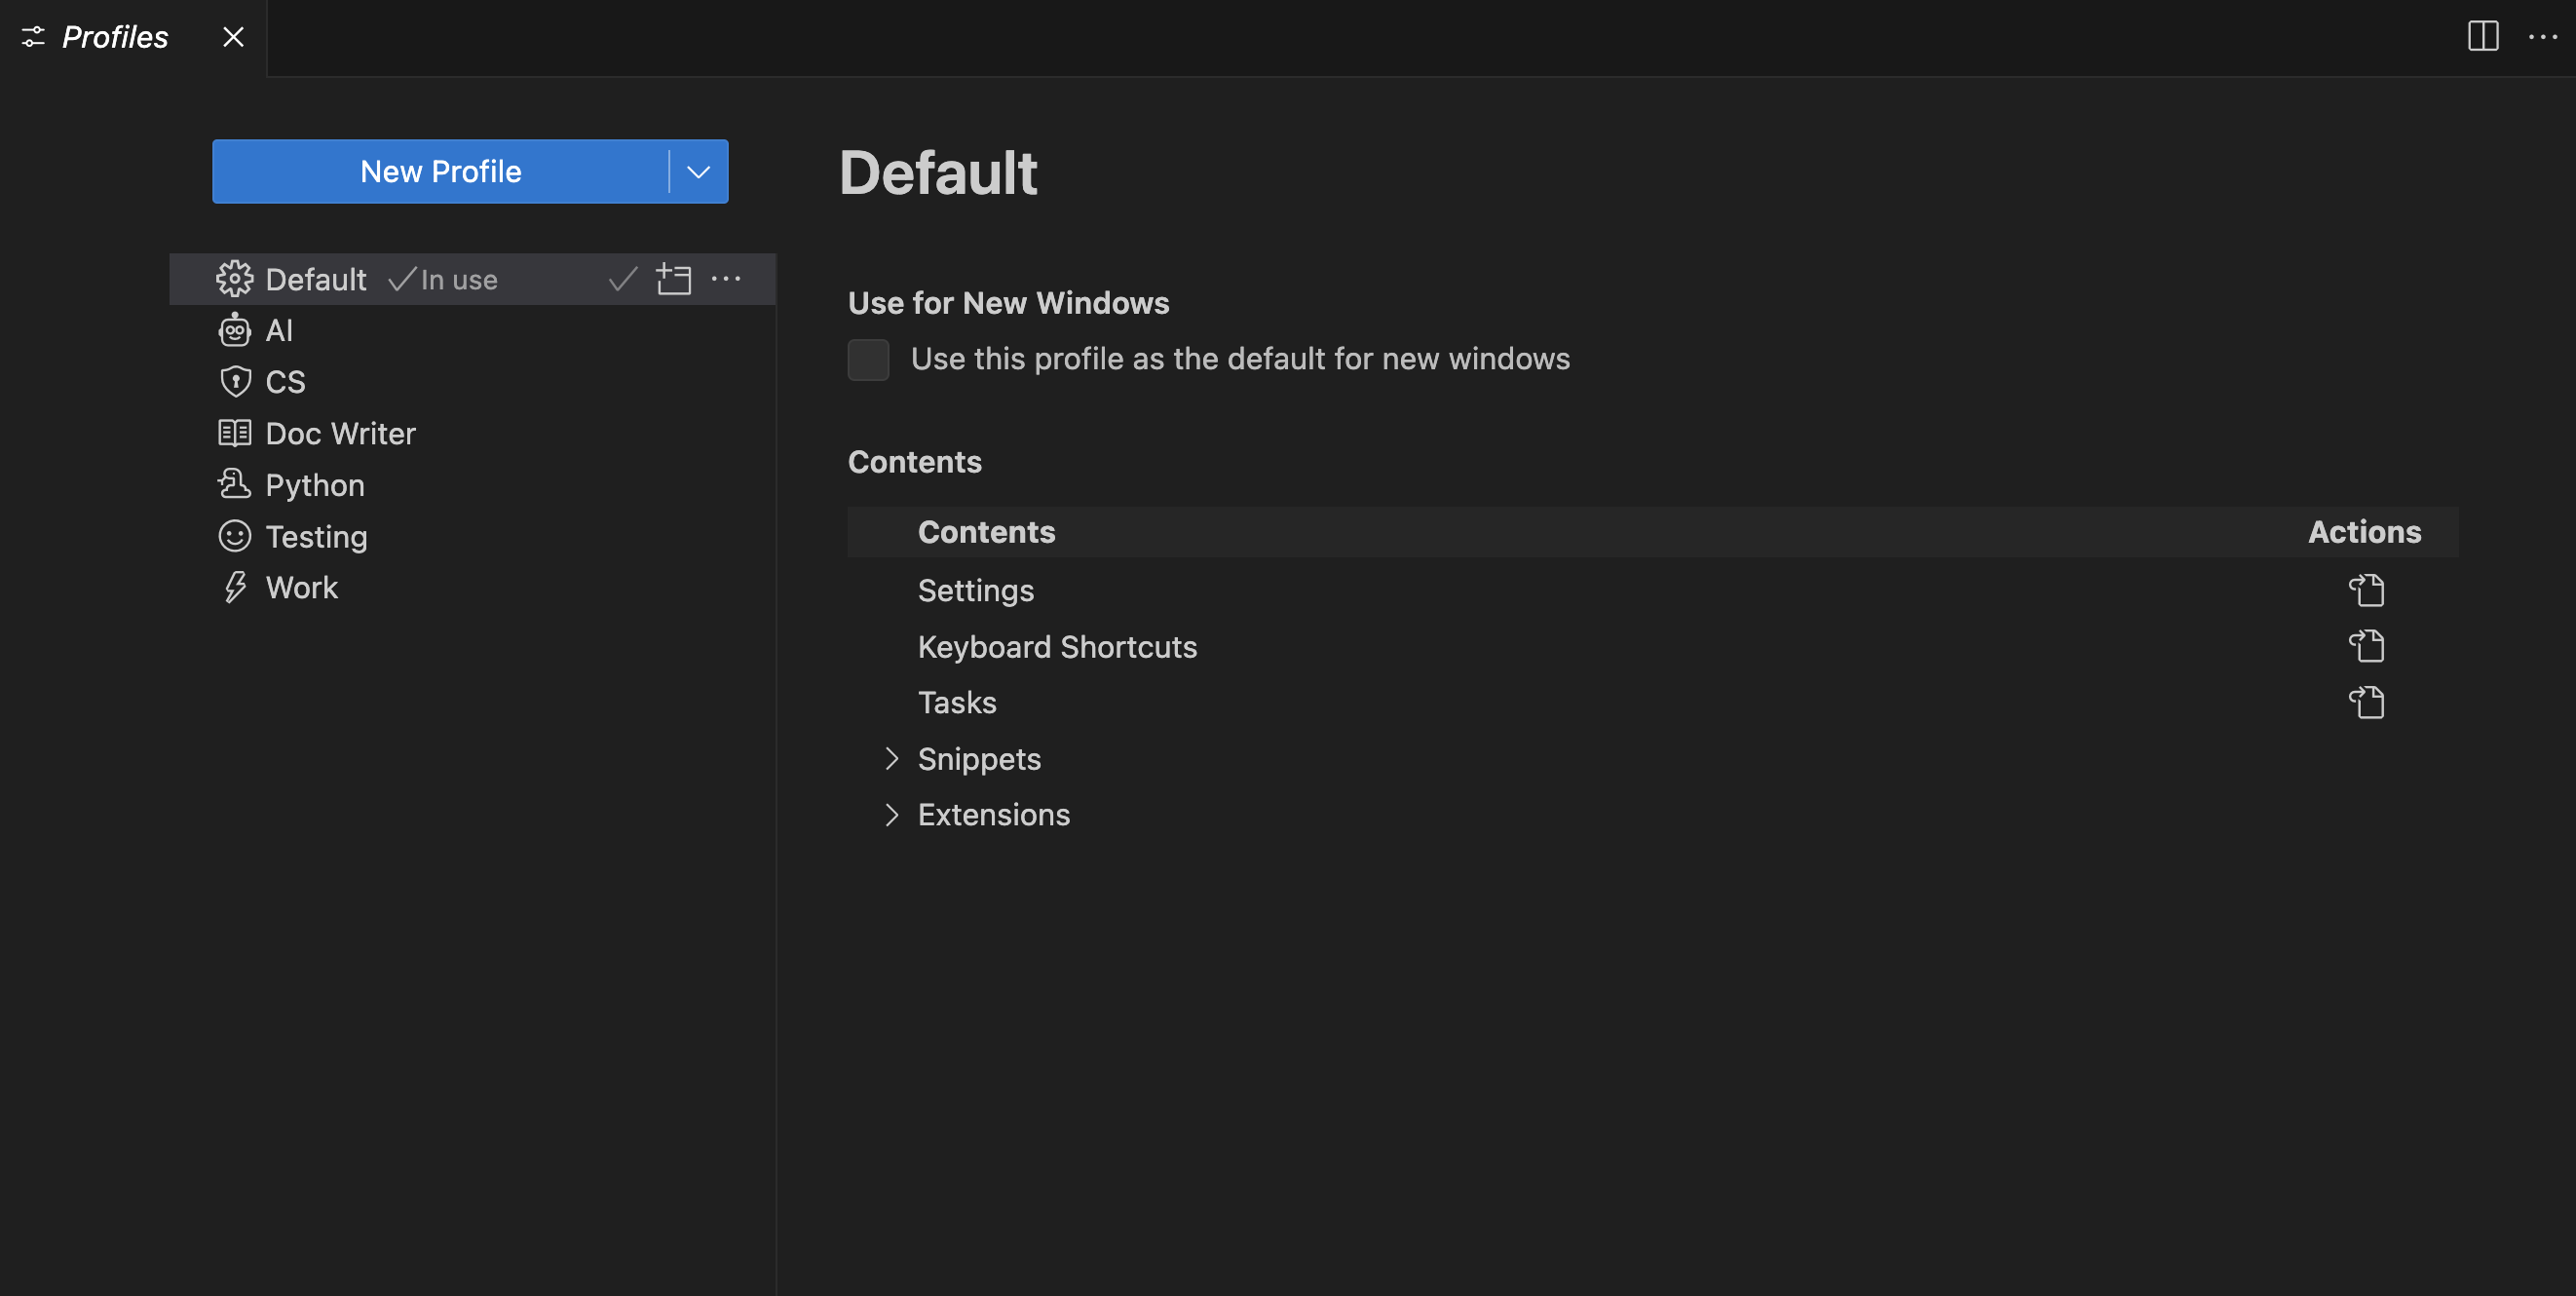
For students, Profiles are better than one giant all-purpose setup. A lighter profile loads faster, avoids extension
clashes, and makes each course feel less cluttered.
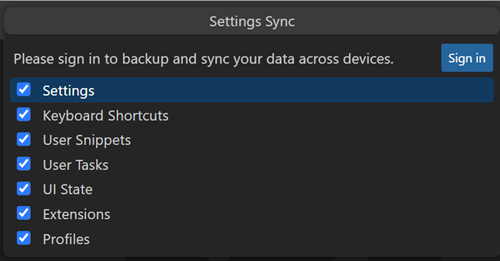
Understanding Settings Sync
Settings Sync connects your editor configuration to your sign-in account so it can be restored on another device.
According to the official documentation, it can sync settings, keyboard shortcuts, snippets, tasks, UI state,
extensions, and profiles. For students who code on more than one computer, this can save hours over a semester.
Step-by-Step: Create a Reusable Student Profile
- Open VS Code and click the gear icon in the lower-left corner.
- Choose Profiles → Create Profile and give it a clear name such as
Student Web DevorPython 101. - Select what to include: settings, extensions, keyboard shortcuts, tasks, and snippets.
- Install only course-relevant extensions instead of copying every extension from your default profile.
- Apply a few stable settings such as Auto Save, Format on Save, and Word Wrap.
- Test the profile by opening a class project, running code, and confirming extensions behave correctly.
Step-by-Step: Export and Share a Profile
- Open the Profiles editor.
- Select the prepared class profile.
- Use the export option to create a shareable profile package or link.
- Share that link through the LMS, class email, GitHub classroom, or lab instructions sheet.
- Ask students to import the profile before the first coding exercise, not during a graded lab.
Step-by-Step: Import a Shared Classroom Profile
- Open VS Code on the student machine.
- Go to Profiles → Import Profile.
- Paste the link or select the exported profile file.
- Review the included settings and extensions.
- Activate the profile and restart VS Code if prompted.
Step-by-Step: Turn On Settings Sync Properly
- Click the gear icon and choose Turn on Settings Sync.
- Sign in with a Microsoft or GitHub account.
- Choose what should sync. For most students, enable settings, extensions, keybindings, and profiles.
- Repeat the sign-in on the second device.
- When prompted, pull the cloud copy if it is the more complete setup.
- Create one profile per course or module.
- Keep required extensions to a minimum.
- Export and test the profile on a clean machine.
- Share written import instructions with screenshots.
- Lock course expectations around one baseline setup.
- Create a course profile on the main laptop.
- Enable Settings Sync after the profile is stable.
- Sign in on the second computer.
- Install required runtimes locally on both machines.
- Use cloud sync for editor preferences, not for source code backup alone.
Conflict Handling and Practical Rules
Sync works best when there is a clear “main” device. If both machines are heavily edited before sync is enabled,
conflict prompts can appear. When that happens, do not guess. Compare the timestamps and keep the version from the
machine that has the most correct recent work.
- Use one device as the setup source first.
- Sync after installing and testing extensions, not halfway through setup.
- Remember that local runtimes like Python, Java, Node.js, or Git may still need separate installation per machine.
- Profiles sync the editor experience; they do not replace your actual project files or version control workflow.
Troubleshooting and Best Practices
Even a strong setup can go wrong if students rush installation or mix too many tools at once. The following issues
are the ones most commonly seen in student labs and beginner self-study environments.
- Sync conflicts: choose the most recently correct machine state, not the one that simply appears first.
- Missing runtimes: an extension can be synced, but Python, Java, Node.js, Git, or compilers may still be missing locally.
- Too many extensions: if VS Code feels slow, disable anything not required for the current class.
- Marketplace or login issues: campus firewall or account restrictions can interrupt sign-in and extension download flows.
- Workspace Trust confusion: students should not blindly trust unknown folders downloaded from the web.
- Different OS behavior: keyboard shortcuts and terminal defaults may differ across Windows, macOS, and Linux.
Best Practices for a Stable Academic Setup
- Use one baseline profile per course.
- Keep a short written extension list in the syllabus or course repo.
- Teach Git separately from Settings Sync so students understand the difference.
- Do a clean test on a second device before rolling out a classroom setup.
- Update profiles at predictable times, such as between units, not during assessment days.
Final Recommendations
There is no single perfect editor for every student, but there is a best default for most situations. The
recommendations below are designed to be practical rather than theoretical.
- Absolute beginner student: use standard VS Code, keep extensions minimal, and focus on learning the interface before adding AI tools.
- CS/IT student: use VS Code with separate Profiles for Python, web, and systems courses; turn on Settings Sync after the baseline is tested.
- Privacy-focused user: choose VSCodium if telemetry policy matters more than perfect marketplace convenience.
- AI-heavy user: start with VS Code plus Copilot; move to Cursor or Windsurf only when your workflow clearly benefits from deeper AI integration.
- Low-budget user: stay on standard VS Code and use the free ecosystem first. It is already strong enough for serious learning.
- Classroom or lab deployment: standardize one tested profile, document the install process, and train students to import before class begins.
For most learners, the best answer is simple: start with standard VS Code, build one clean course profile, turn on
Settings Sync only after the profile is stable, and upgrade to paid AI tools only when the need is clear.
Sources and References
The information in this guide was compiled using official documentation and pricing pages. For further reading,
please visit the following resources:
- https://code.visualstudio.com/
- https://code.visualstudio.com/docs/supporting/FAQ
- https://code.visualstudio.com/docs/setup/setup-overview
- https://code.visualstudio.com/docs/configure/profiles
- https://code.visualstudio.com/docs/configure/settings-sync
- https://code.visualstudio.com/docs/getstarted/extensions
- https://vscodium.com/
- https://github.com/features/copilot/plans
- https://cursor.com/pricing
- https://windsurf.com/pricing
